THIS MANUAL IS FOR FPP v1.x AND IS NOW OUTDATED.
Please follow the link below to go to the current version of the FPP manual.
https://falconchristmas.github.io/FPP_Manual.pdf
The manual is also available by clicking the 'Manual' link at the top of the 'Help' menu in FPP.
Pixel Overlay Models
The Pixel Overlay functionality enables a group of channels to be re-used and overlaid with data / effects outside of the sequences being played. This is achieved by defining Pixel Overlay Models, each targeting specific channels and then using different plug-ins or scripts to write to these channels directly.
Popular uses of this functionality are to display a running text string on a matrix, or as a countdown timer.
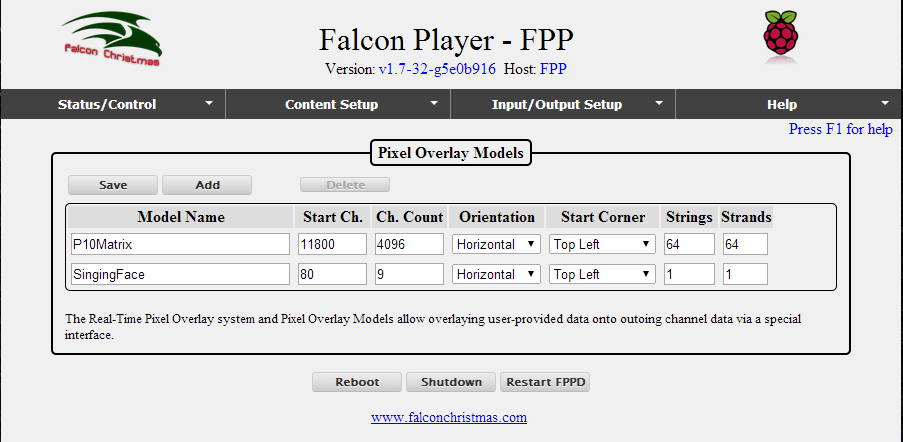
Start off by clicking Add to define a Model Name. The model defines the start channel, the total channels, the orientation (which way the strings run), the number of nodes per string, and the number of strands per string (if a string folds over once and runs across your matrix twice, then it has 2 strands per string).
Note that the start channel is the same as the start channel defined in your sequencer model definition. In the example of the P10Matrix above, the matrix area covers a 3 3 panel (32 16) setup.
Click on Save to save the model definition. The definition can be updated by selecting it, changing any of the details and then saving the changes.
Use the Matrix Tools Plugin to test and create a Pixel Overlay script.
Tip: An example of this is the PixelOverlay-Countdown pl script which displays a countdown message script on the model defined i.e. Generate a 2-line string with the word Christmas on the top line and a countdown timer like "43d 12h 3m 32s" on the second line
You need to download a script from the script repository and edit it to use the model name specified in your Pixel Overlay Model definition:
my $name = "P10Matrix"; # Memory Mapped block name
You can then change other values that are specific to the functionality of the script i.e. the message to be displayed in this case.
Another attribute is the Block State value.
Enable the block (pass 2 for transparent mode, or 3 for transparent RGB)
$fppmm->SetBlockState($blk, 1);
The possible values are: Enable mode (1), Transparent mode (2), Transparent RGB mode (3).
- Enabled takes full control over the channels and only displays what the (plug-in) overlay has in it. This will give you the clean blank text, no sequence data will show through until you switch either back to Disabled or one of the Transparent options
- Transparent RGB only overlays the channels with values so you can overlay text on top of running sequence data. Any non-zero value causes a full 3-channel triplet to be overlaid.
- Transparent mode will overlay individual non zero channels so you could have a pixel with 1-2 channels coming from the sequence and the other 1-2 coming from the overlay
- Disabled - The overlay for this model is disabled, the matrix/tree shows what is in the running sequence.
Note: The Matrix Tools Plugin also enables you to enter a text string, set colors and change parameters on the screen and see the results on the output of overlay straight away.
Tip: When using the Pixel Overlay for RGB pixels, you should use Enabled or Transparent RGB. If you use Transparent, you will get very odd colors on your display since it only copies single channels from the overlay data instead of all 3. If the overlay color for a pixel is red and the sequence is blue, then you will get purple since the blue is not zeroed out. If you use Transparent RGB, the blue from the sequence data would get zeroed out as the whole RGB triplet of channels is copied from the overlay data.
If "Enabled" is used, then the sequence data is NOT displayed at all, rather whatever (text) is in the Matrix Tool script . When the mode is switched back to "Disabled", the sequence data will start back up immediately.
Tip: Should you have to kill your script, use the following command:
kill $(ps -edaf | grep YourScriptName.pl | grep -v grep | awk '{print $2}')